Raymii.org

Quis custodiet ipsos custodes?Home | About | All pages | Cluster Status | RSS Feed
Gherkin 30% keyboard build log and review
Published: 29-06-2019 | Author: Remy van Elst | Text only version of this article
❗ This post is over six years old. It may no longer be up to date. Opinions may have changed.
The Gherkin keyboard is a 30% (actually a 30 key) keyboard kit. I've built one and used it for a while, this article covers the build and my experiences with such a small board.
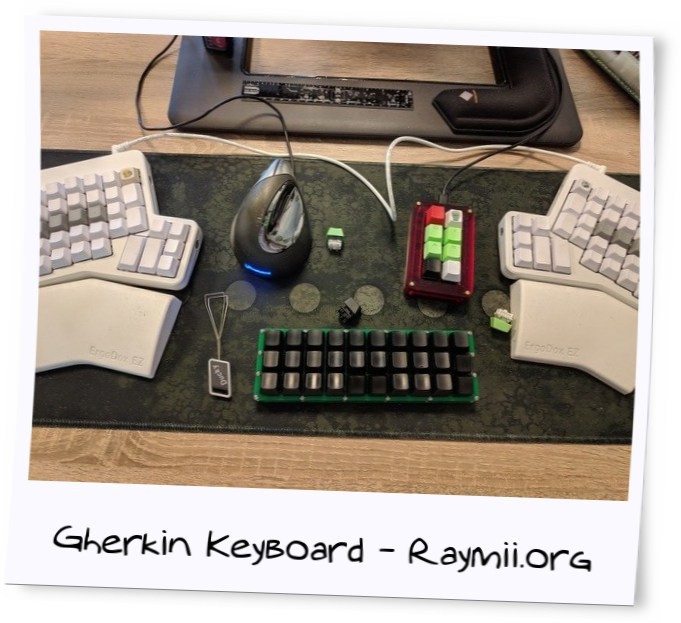
The above image shows my finished Gherkin with my other desk peripherals.
I've used donor keycaps from a Das Keyboard, the keycaps for space, return,
enter and layer switch/esc are upside down to make it a bit more distinct.
Recently I removed all Google Ads from this site due to their invasive tracking, as well as Google Analytics. Please, if you found this content useful, consider a small donation using any of the options below. It means the world to me if you show your appreciation and you'll help pay the server costs:
GitHub Sponsorship
PCBWay referral link (You get $5, I get $20 after you've placed an order)
Digital Ocea referral link ($200 credit for 60 days. Spend $25 after your credit expires and I'll get $25!)
Review
I've used the gherkin as main board for three days. I'm used to a split
ErgoDox EZ, so going back to a non-split board takes getting used to.
If you're asking yourself, how could you use such a small keyboard, then let me
introduce you to the concept of layers. On your regular keyboard you probably
use the SHIFT key to create a CAPITAL letter. Or the CTRL key combined
with C to copy text. Those keys act as a modifier to let a key do something
else then it usually does. SHIFT could be seen as layer 1, where the regular
layer could be layer 0. The Gherkin forces you to use layers a lot more.
Here's an image of the layout I use, courtesy of Aidan:
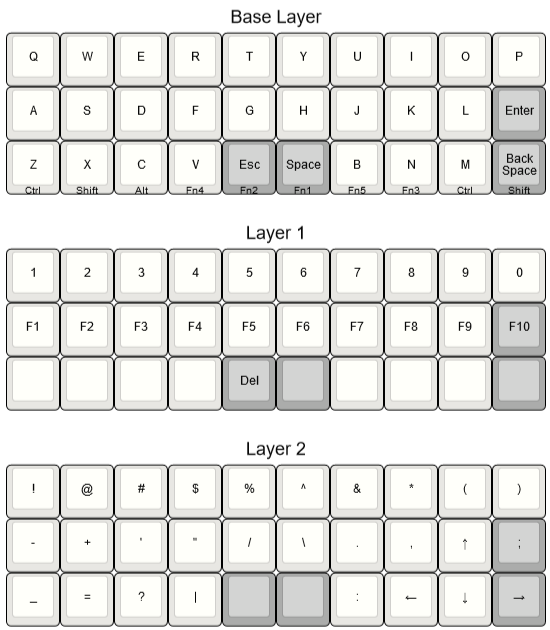
By pressing and holding either space or esc I can switch to layer 1 or 2
where the modifiers are. I did change a few keys around (like the square and
curly braces) but I haven't got such a nice picture of that.
The second thing that is different from a regular sized keyboard (next to the size) is that the keys are not staggered but ortholinear. They're right above one another, not a little to the side. The idea is that your fingers are better at stretching and bending than at moving sideways, so it should give less finger strain.
The Ergodox EZ is also an ortholinear board, so that is another feature I'm already used to. On a normal (as far as you can call this normal) board it is quite strange to experience. I've positioned both halves of the Ergodox a little bit skew so it follows the natural hand position.
Below is a size comparison between the Gherkin (20 cm), a Vortex Core (40% keyboard) and a full size HP cheap rubber dome board lying around at work. The Vortex already is very small, the Gherkin takes it a step furter. One of my co-workers used the Vortex fulltime.

After three days I went back to the Ergodox due to extreme wrist pain, but I'm not sure if that is because the Gherkin or because a non-split board. Recently I was forced to use a laptop (without external keyboard) for a week and then I had the same pain.
I was able to use the new layout after a few hours. I did print out a picture, after two days I didn't need that anymore. Since I'm already used to using layers that doesn't take extra time.
If I wouldn't have such pain I think I could get used to this board. It's still on my desk just for the fun of using it, but not as main keyboard.
I do enjoy building keyboard and electronics kits in general, so if you're looking for a fun project to level up your skills, the Gherkin is a cheap way to do so.
The entire kit was less than EUR 20. I do had an Arduino pro micro laying around and used keycaps and switches from another keyboard. If you don't have, then you probably need another EUR 30, depending on the switches and keycaps of course.
Build log
Building a Gherkin is suprisingly simple if you're not using LED's. On Reddit there was a group buy for Gherkin kits, so I got two. My kit contained the following:
- Gherkin PCB
- Top switch plate
- Bottom plate
- 30 diodes
- Brass standoffs and screws
I used the following out of my own hobby stock:
- Arduino Pro Micro (with THT pin headers)
- 24 Cherry MX brown plate mount switches
- 3 Kailh Box Royal plate mount switches
- 3 Kailh Box Jade plate mount switches
On the below picture I just soldered the diodes and Arduino headers
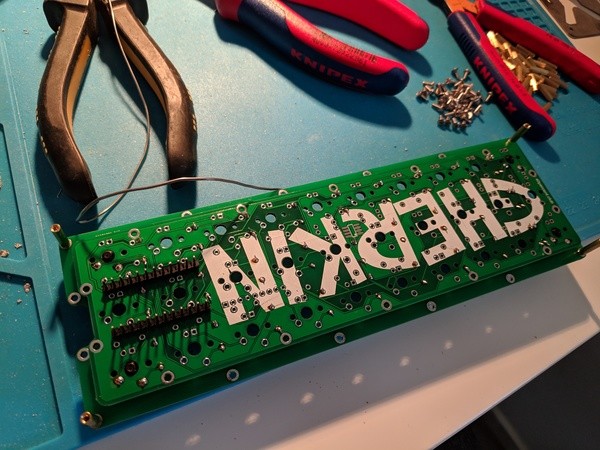
The first step is to solder in the diodes. The PCB has diagrams for every components, including the position of the diodes. Match the white stripe on the PCB with the (black) stripe on the diode and you're good to go. Do check it again, and again, and one more time to be sure.
If you do have LED's you also need to solder the resistors and SMD solder a MOSFET. I don't care for RGB leds so I skipped that part.
The second step was soldering the Arduino pin headers. My pin headers were to large to fit the bottom plate, so when everything was done I clipped off the headers to make it fit.
Step three involves the switches. I started with the four switches in the corners, clip them into the switch plate and carefully put the plate on the PCB. Check that the pins fit the holes and don't force it, otherwise you'll break your switches.
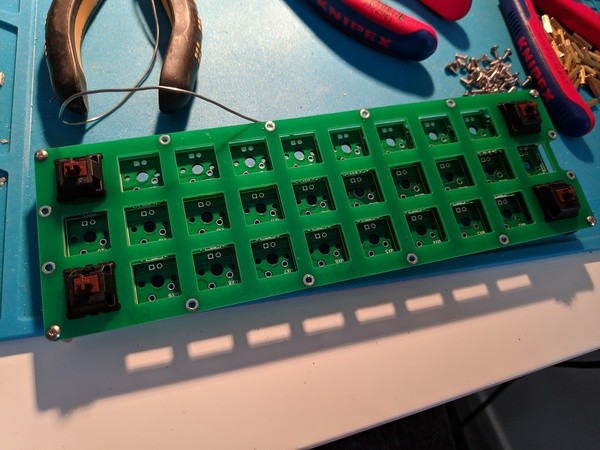
Once they fit snuggly, solder them in. Then do all the other switches. The below picture shows my keyswitches before soldering them all in:
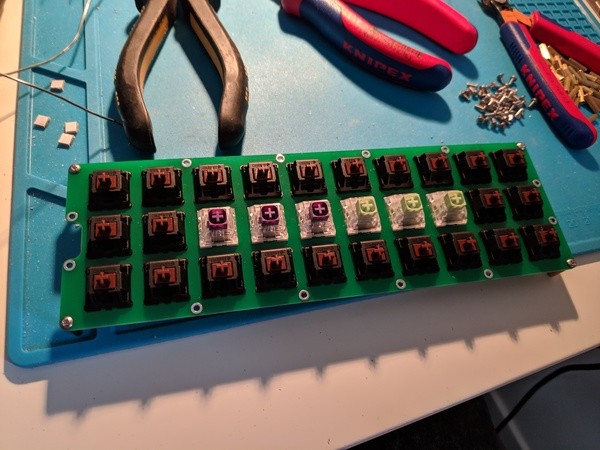
If you have it, use some flux cleaner to wipe off excess flux.
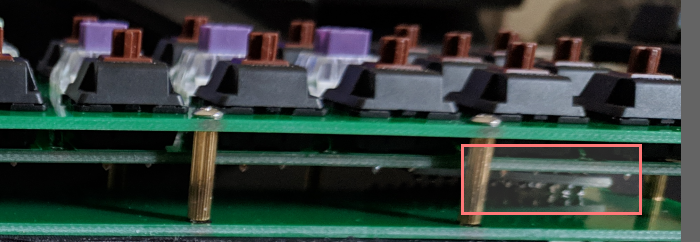
Do note the two switches on top (or below) the Arduino. Clip off those pins after soldering, otherwise the Arduino doesn't fit snuggly. I forgot that so my Arduino is a bit slanted. It still works but it could be neater. The below picture shows my slanted Arduino:
For step four you'll need your Arduino. I prefer to test it first before soldering it in, since that is quite a permanent step. Connect it to your computer and flash the firmware with QMK toolbox. You do need to compile QMK but that's a different topic, not for this short guide. If the arduino boots and the flashing is successful, it probably works good enough.
Solder it in to the header pins. The bottom of the arduino (the part without the chips and leds) must face the same way as the bottom of the gherkin. The USB plug should be sandwiched between the Gherkin PCB and the Arduino. On the Gherkin PCB the holes for the Arduino are not labeled, which is why I state it here. I then screwed on the brass standoffs into the top plate and tested all the keys. If there are any problems, try to redo the solder or replace the keyswitch.
When they all work, finish off the build by screwing in the bottom plate, placing the keycaps on the switches and if you have them, snapping on some rubber feets for some more grip.
That's all there is to it. My build took half an hour all together. Quite fun!
Tags: arduino , articles , electronics , ergodox , gherkin , keyboard , macropad , mechanical-keyboards , qmk